

Hi all. Here are some notes about how I setup an external effect in Cubase 15 using my SSL 12 audio interface.
Why would I want to do this? Well, I have decided to move some of my mastering chain into hardware devices for a couple of reasons. Firstly, I want to free up some processing power by removing plugins (I’m fed up of switching oversampling options between tracking and exporting). Secondly, I’ve had a really good experience using my WA73 preamp when recording vocals – the hardware just sounds really good.
So, the task at hand is to setup a Warm Audio Bus-Comp (an SSL bus compressor clone) to use a glue compressor on the master bus in Cubase.
Hardware connections
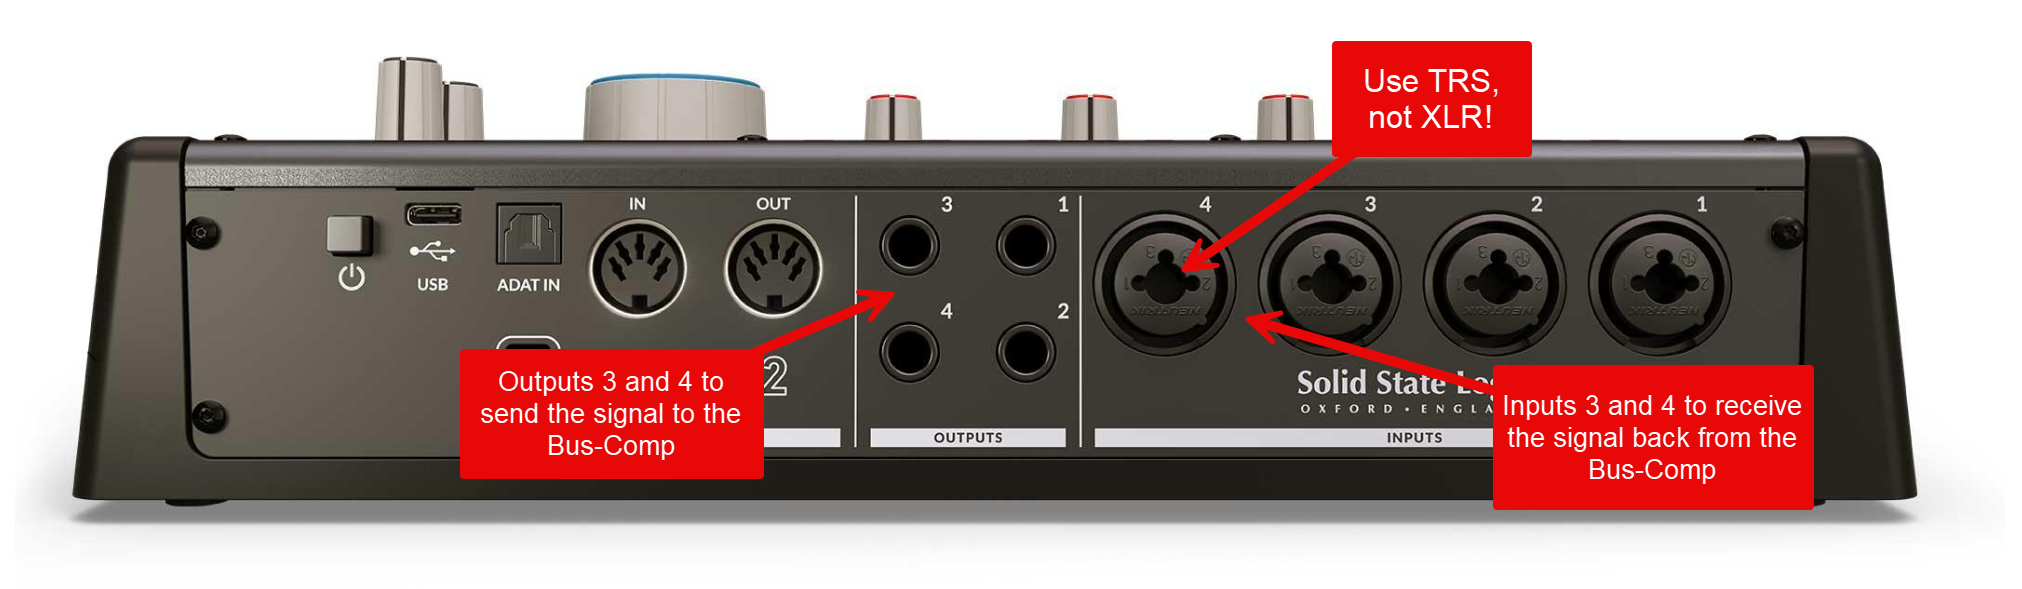
I decided to use inputs and outputs 3 and 4 on the SSL 12 for this. Outputs 3 and 4 of the SSL 12 will send the signal to the inputs of the Bus-Comp, and analogue inputs 3 and 4 will receive the processed (compressed) signal back from the Bus-Comp via its outputs.
Important: Don’t use normal balanced XLR cables to send the signal back from the Bus-Comp. Use TRS at the SSL 12 end to access the line level inputs of the SSL 12. We want to use line level because that’s what the Bus-Comp uses. More on this later when we setup the SSL 12 in the SSL 360 software.
Setting up the SSL 12 using SSL 360
Now we need to setup the SSL 12 using the SSL 360 software.
In the SSL 360 Software, ensure line outputs 3 & 4 are decoupled from the main volume knob so monitor control adjustments don’t alter send levels. Click the “DIRECT TO BUS” button on Playback Return 3-4 to do this. All the controls become greyed out when this is selected.
If Line Outputs 3 & 4 remain linked to the physical Monitor Level knob on top of the SSL 12, turning that knob to adjust speaker volume would also turn down the signal heading into the Bus-Comp. Every time you changed playback volume, your compressor’s threshold, gain structure, and tone would shift.
Decoupling Line Outputs 3 & 4 routes the digital audio straight out of the interface at full +4 dBu line level (+24 dBu max headroom), leaving the monitor knob dedicated solely to main speakers (Outputs 1 & 2).
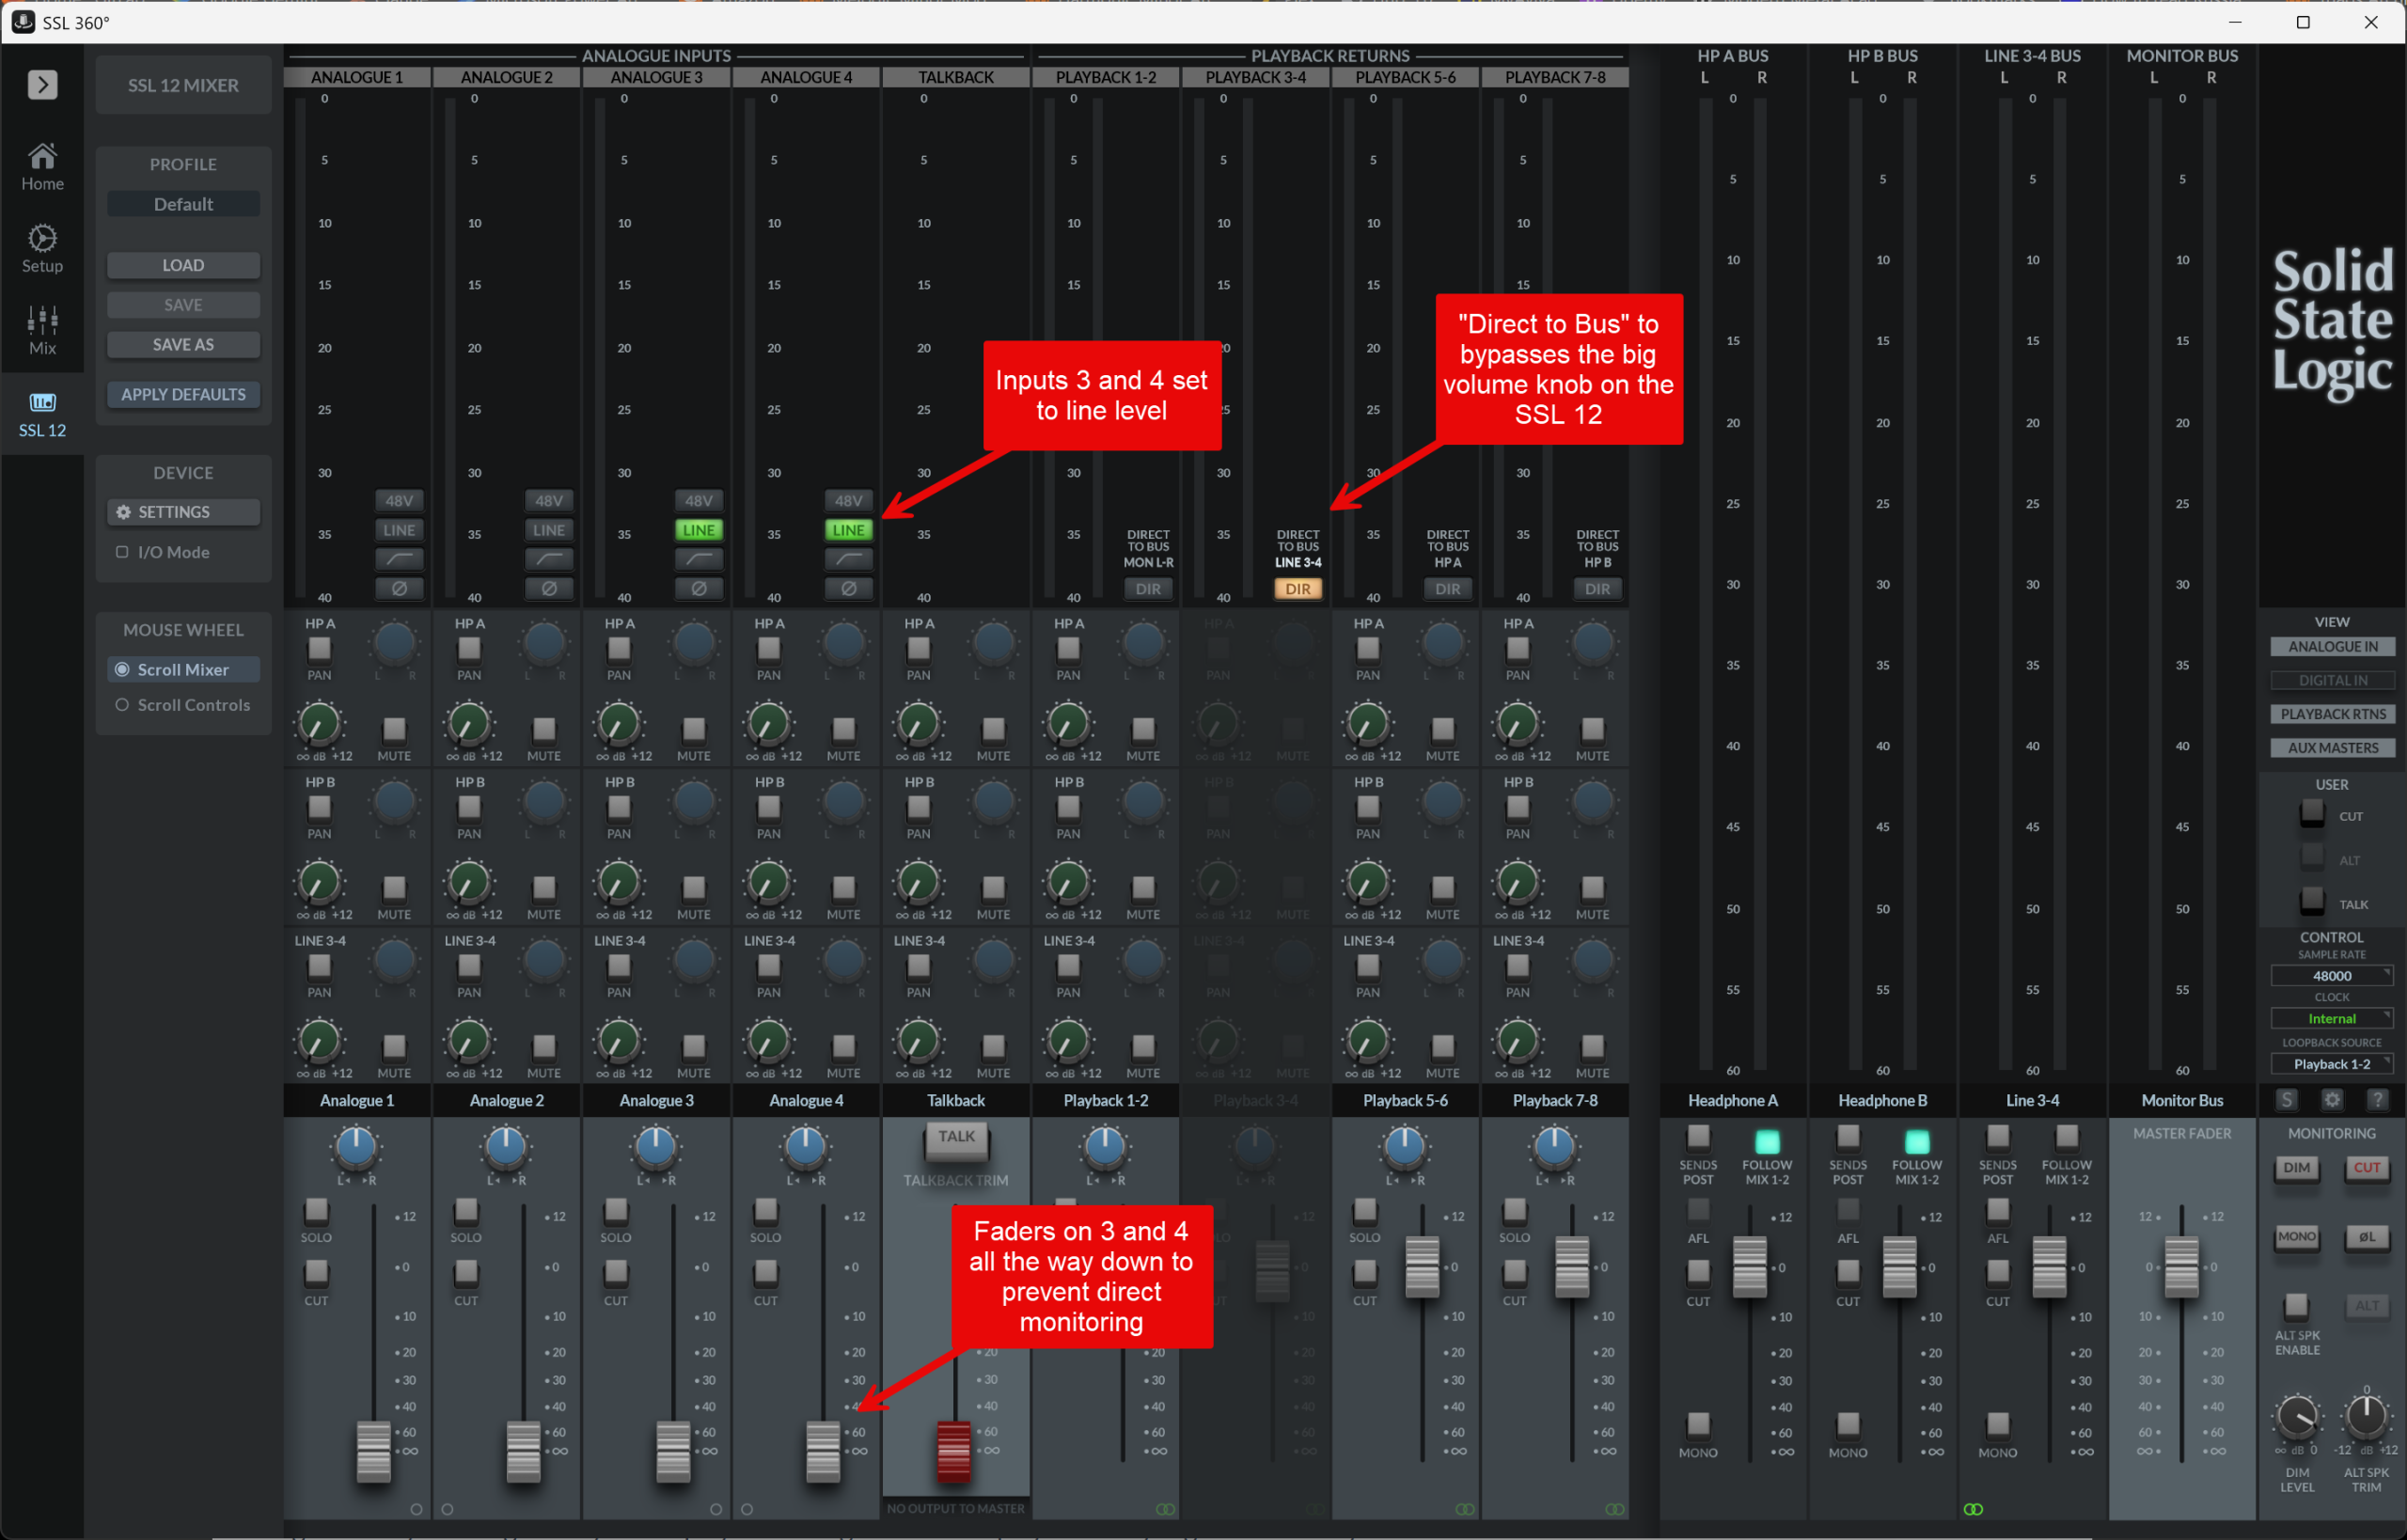
Set Analogue Inputs 3&4 to “LINE” by clicking the buttons in SSL 360 (or using the buttons on the hardware device, if you prefer).
Because the rear physical connections are combo jacks (taking either XLR or 1/4″ TRS), you need to tell the SSL 12 to treat physical inputs 3 and 4 as Line Level rather than Mic Preamps. Look at the top panel of the physical SSL 12 hardware above input gain knobs 3 and 4. Press the LINE button on Channel 3 and Channel 4 so that the LINE indicator lights up. If you prefer configuring it digitally, you can also toggle the LINE switch for Channels 3 & 4 inside the channel strips of the SSL 360 software.
When LINE mode is active, the interface bypasses the high-gain mic preamp stage and pads the input to handle the standard +4dBu signal coming from the Bus-Comp.
Drop the faders for Analogue Inputs 3&4 all the way down.
If you don’t do the you will get direct monitoring of those channels. When you are using Cubase you’ll hear a second signal layered on top of what’s playing in Cubase. Ask me how I know; it really confused me for a while.
I was experiencing Direct Monitoring phase-cancellation combined with mono-summing in the interface’s internal cue mixer. Hearing a slightly delayed duplicate signal that stayed present even when I pulled down the Cubase Master Fader meant the raw input signal from inputs 3 & 4 was being fed directly back to my speakers via outputs 1 & 2. Because Cubase was also playing back the processed return signal I heard both the zero-latency analogue hardware loop and the delayed DAW loop at the same time. The duplicate sounded mono because the hardware input channel strip in SSL 360 was currently panned to the centre.
By the way, the mute buttons on Inputs 3&4 didn’t seem to work for some reason, so I resorted to using the faders.
Cubase setup
This is pretty standard. Firstly setup an External Effect in Cubase 15:
-
Go to
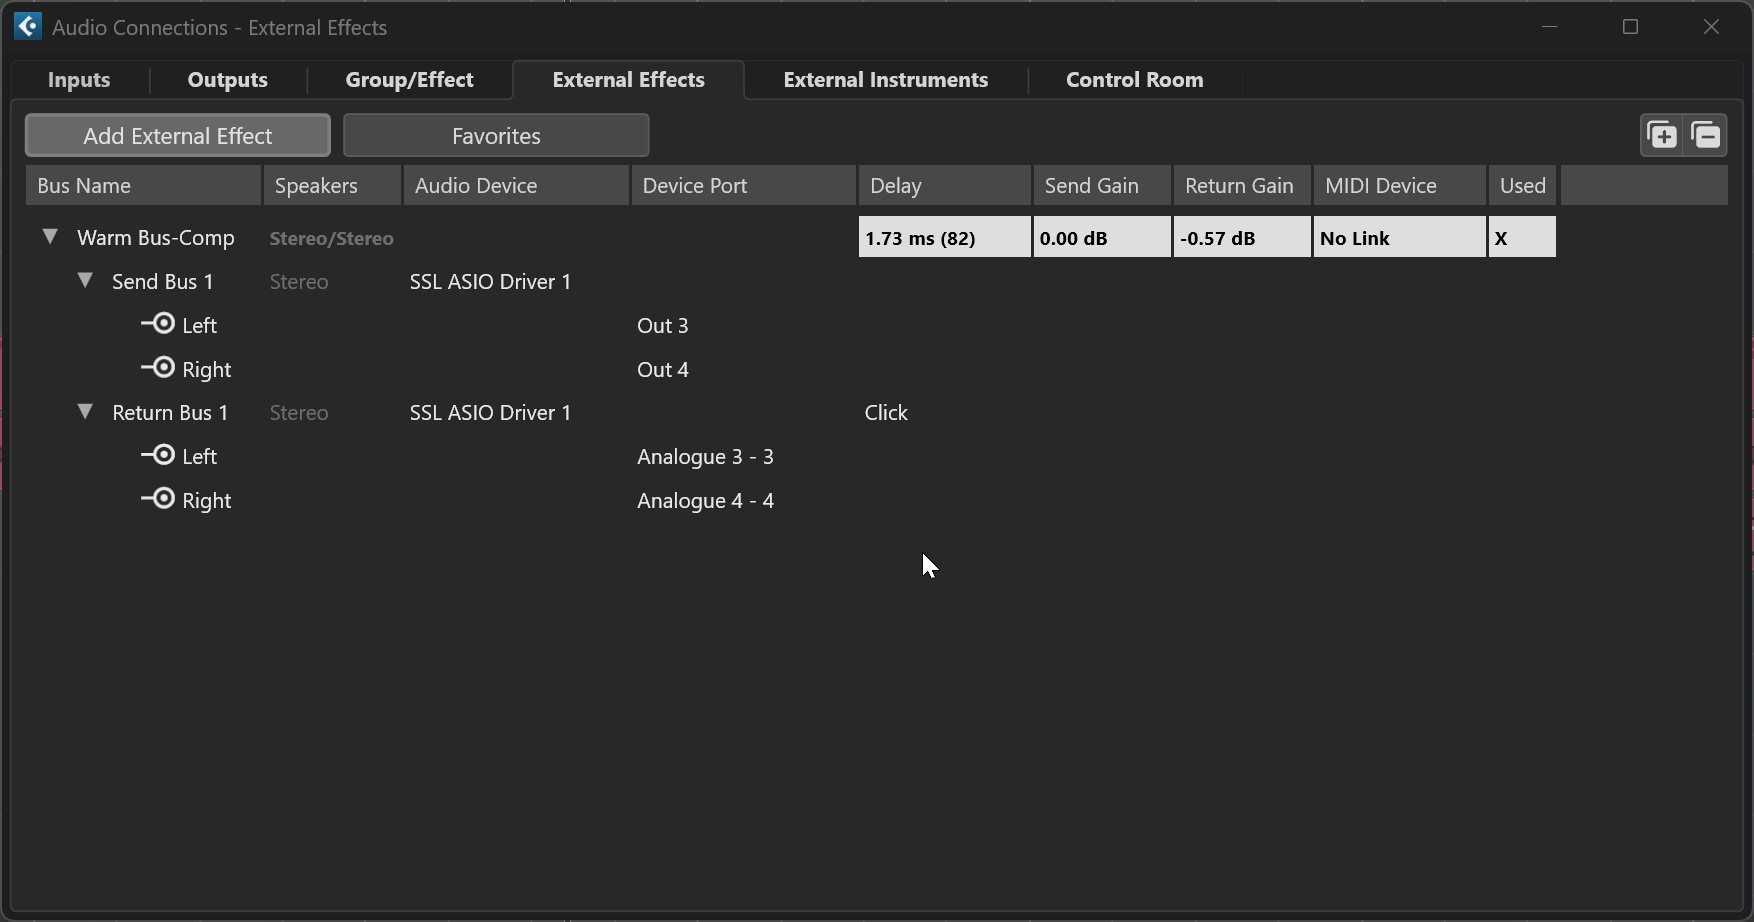
Studio>Audio Connections>External FX. -
Click Add External FX, name it
Warm Bus-Comp. -
Map Send Outputs to
SSL Line Out 3 & 4. -
Map Return Inputs to
SSL Line In 3 & 4.
This is what I ended up with:
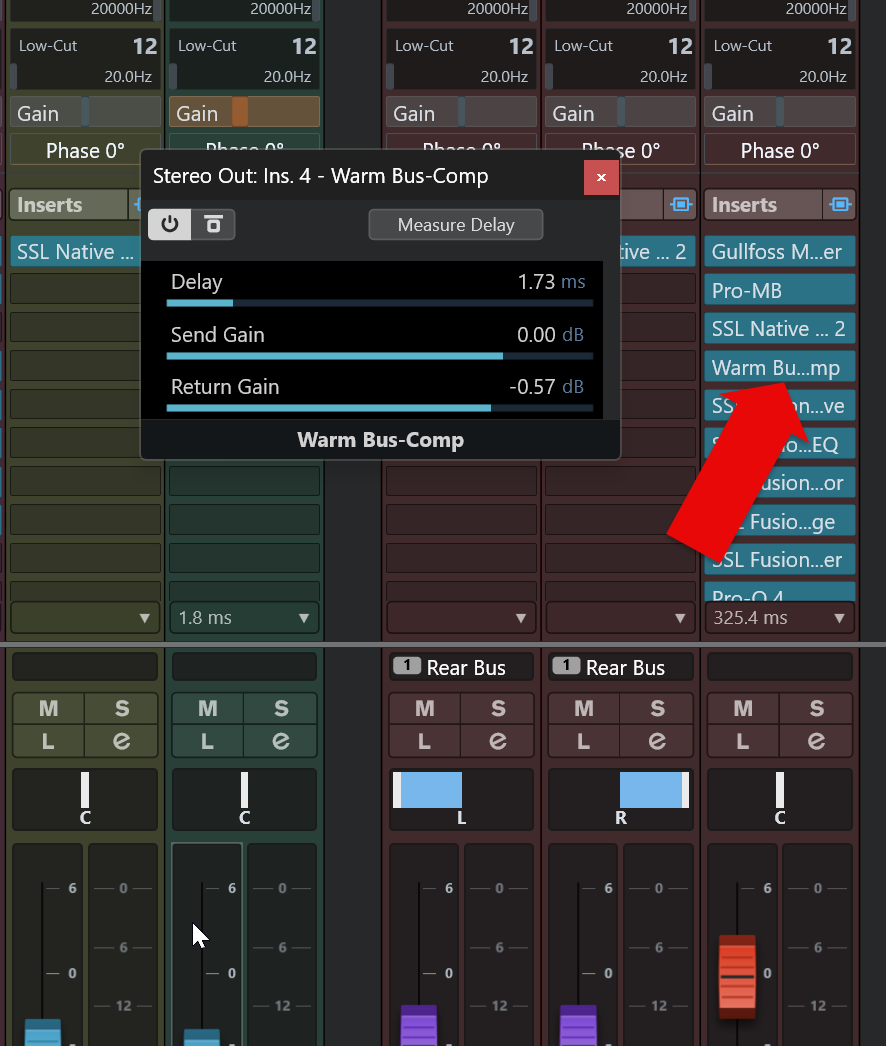
Then you can insert the External Effect plugin on your channel in Cubase. In my case, on the Master bus.
Calibration
At this point things should be working. However, in the case of the Warm Audio Bus-Comp I also needed to do some calibration to ensure unity gain (where audio passing through the unit with 0dB gain reduction) had the exact same volume as the digital source.
To do that I followed this process.
Generate Reference Tone
-
Insert Cubase’s built-in TestGenerator plugin on an empty audio track or insert it directly ahead of the External FX insert.
-
Set the TestGenerator to produce a 1 kHz Sine Wave at -18 dBFS (the standard digital alignment reference for +4 dBu analogue equipment).
Calibrate the Send & Return Unity Gain
-
Set the Bus-Comp controls:
-
Compressor Switch: OFF.
-
Transformer Switch: OFF.
-
Make-Up Gain: Set to
0.
-
-
Play the -18 dBFS 1 kHz tone through the Cubase External FX routing.
-
Check the returning signal in Cubase on the Return channel or via a level meter plugin.
-
Adjust Input Trim: Adjust the gain on SSL 12 Inputs 3 & 4 (set to Line mode) until the returned signal reads exactly -18 dBFS in Cubase.
Note that I ran into an issue here. Even with the gain knobs on the SSL 12 at zero I still had a slight increase in volume when the External Effect plugin was engaged versus disengaged. I compensated for this by turning down the Return Gain slightly in the plugin. This wasn’t guesswork by the way – I used metering plugins to see what was actually happening (the SSL Meter Pro actually).
Calibrate the Bus-Comp Gain Reduction & Make-Up
-
Engage the Bus-Comp.
-
Set Threshold all the way up (10 dB) so no compression occurs yet.
-
Verify the returning signal still reads -18 dBFS. If it deviates slightly, fine-tune the Bus-Comp’s Make-Up Gain dial until the return level hits -18 dBFS precisely.
-
If you turn on the Transformer Engage switch, the CineMag transformers may add a slight boost or harmonic change. Check the return meter in Cubase and trim the Make-Up Gain if needed to maintain level-matched comparison.