

For an introduction to Pat Martino’s method, see this post: Pat Martino’s Linear Expressions – Part 1 – Introduction and Phase I Practice
Phase II: Vertical Movement
The second phase of Pat Martino’s Linear Expressions covers what he calls Vertical Movement. This is actually pretty straightforward; it’s all about practicing the chord inversions and activities in one area of the guitar neck. Contrast this with Horizontal Movement which is more about staying in one key and seeing how the activities and inversions link together up and down the neck.
Martino presents 12 pages (one for each of 12 keys) all focused in the area of the neck between the 1st and 5th frets. For each he shows a chord inversion, and the associated activity (notation and graphical representation). I’m not going to repeat all of that here. Get the book!
A key observation by me: this practice is not yet about implementing the method in musical context. The practice is intended to provide the base vocabulary to be taken forward later.
Phase III: Vertical and Horizontal Movement
At this point the practitioner will have learned 4 chord inversions for basic minor seventh chord forms and all 5 associated activities for each in all 12 keys. They should be able to recall and play chord inversions and activities across, up and down the neck.
Phase III is titled Vertical and Horizontal Movement, is really a set of Line Studies, intended to demonstrate the application of linear movement using the five forms of activity through all twelve keys.
The studies are all in staff notation. No tablature I am afraid. I won’t reproduce them all here, but the first one is presented below. Watch out for errors – there were a few places where creating tab wasn’t straightforward.
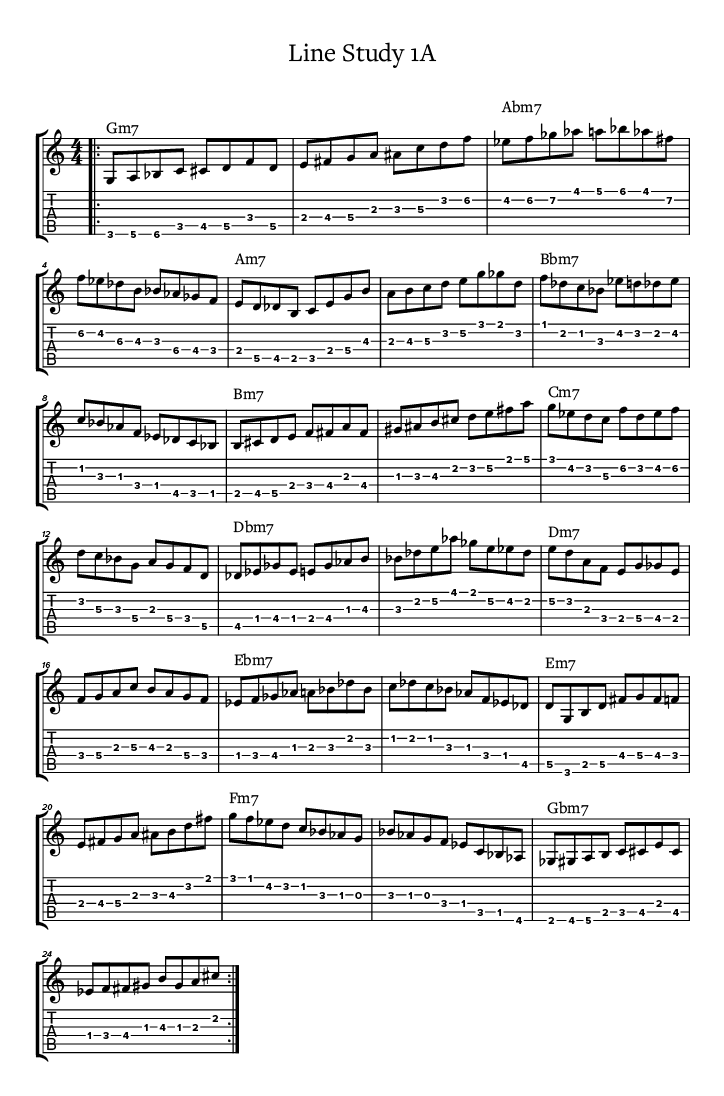
A key observation by me: Phase III is all about seeing how we might join activities together to make lines but we are still working with just minor chords – we are not yet seeing how the method is used on ‘real’ chord changes.
Phase IV: Substitution & Reduction
This is where the real work begins – the process of implementing the method.
To derive the method, Martino presents an analysis of his tune Nadine and indicates how the appropriate minor forms are derived for each chord in the piece. For the novice, this may not be the most obvious way to present the approach and it takes a bit of unravelling.
Essentially the exercise of analysing Nadine reveals a partial set of substitution rules which can be extended to create a more comprehensive set of rules.
Substitution Table
I’m applying a short cut here. Below is the conversion table with no explanation of how each conversion is derived. I’ll do some explanation later but I want this aide-mémoire in place for me.
| Chord Type | Minor Conversion Rule | Example Chord | Play Minor Scale / Lines From | Resulting Harmonic Colours over Root |
| Minor 7th (m7) | Minor on the Root | Dm7 | D minor | 1, b3, 5, b7 (Straight tonic/subdominant minor) |
| Dominant 7th (dom7) | Minor on the 5th (5) | G7 | D minor | 5, b7, 9, 11 (Suspended dominant sound; pairs ii-V) |
| Major 7th (maj7) | Minor on the 3rd (3) or 6th (6) | Cmaj7 | E minor (or A minor) | E minor yields 3, 5, 7, 9 (Cmaj9); A minor yields 6, 1, 3, 5 (C6) |
| Half-Diminished (m7b5) | Minor on the Minor 3rd (b3) | Dm7b5 | F minor | b3, b5, b7, b9 (Dm11b5) |
| Altered Dominant (dom7(alt)) | Minor on the flat 9 (b2) | G7alt | Ab minor | b9, #9, 3, b5, #5, b7 (Derived from Ab Melodic Minor) |
| Diminished 7th (dim7) | Minor a whole step below any chord tone | Bdim7 | A minor (or C, Eb, F# minor) | Resolves symmetrically into dominant and chromatic tensions |
Observation: in a ii-V-I progression, the same minor substitution works for the ii and the V. In the table above, we have Dm7, G7 and Cmaj7 as examples. They would form a ii-V-I progression. For Dm7 and G7 the D minor substitution works for both. Add E minor for the Cmaj7 and that’s the whole ii-V-I covered by 2 minor forms.
Essentially, the method can be summarised as:
-
Identify the target chord’s root.
-
Calculate the single relative minor anchor point.
-
Shift your default minor motor patterns to that fret position.
Example – Minor Conversion of Major 7th
To apply minor conversion to a maj7 chord, we proceed as follows (taking Cmaj7 as an example):
-
Take a Cmaj7 chord: Notes are C – E – G – B (root – 3 – 5 – 7).
-
Look at the notes starting from the 3rd (E): E – G – B together form an E minor triad (root – b3 – 5) which can be extended to E – G – B – D for Em7 if we add the 9th of C.
-
So, playing E minor over C omits the root and outlines the 3rd, 5th, 7th, and 9th of the C major sound.